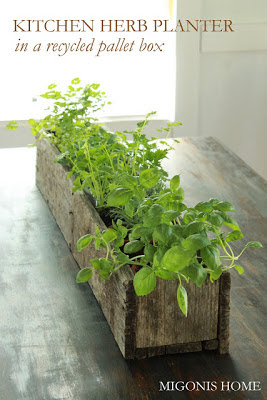
Finally this week the garden went outside, and a planter box came inside! I kinda just made it up, because none of the plans I found were the right size and because it's just a simple box and shouldn't be too hard.
Inspiration pics:
 |
| TheBeatThatMyHeartSkipped |
 |
| Migonis Home |
 |
| Creatively Southern |
 |
| Ana White |
Those last two in particular, because they have handles. Isn't that just smashing? I love the color of the second one, too. If our wood had been that deliciously old and dark, I would have kept it natural.
Here's what I made!
Just ignore the fact that they're planted too low and you can see the unpainted insides. I ran out of dirt. I know, it sounds ridiculous but it happened.
Anywho, here's what I did.
First, the Joe and I traveled far and wide to find some suitable wood (Home Depot). We came home bearing two cedar fence planks and some wee screws. And also a new hand saw, because our first one was left here by the previous owners (very nice of them, it came in handy many times) and it was pretty dull and not a little bit rusty. So, with the help of our fancy new saw, I started cutting our boards to length. After one cut had been made, Joe noticed I was using the brand new saw and wanted to try it out to see how magical it was. I graciously stepped aside and let him finish doing the rest of the boards. :)
 |
| Magical, indeed. We use buckets to saw wood because we're legit like that. |
Our kitchen window has a mini-bay-window thing going on, so we could fit a pretty sizable box. The boards were about 5 1/2" wide. Our three long pieces were cut to 34", and our end pieces were cut just shy of 6 3/4".
We screwed the long side pieces into the outside edges of the bottom piece first, then attached the ends. The wood split slightly in some places as we screwed it all together, but we just decided it would add to the "rustic" look of it all. Right? Poorly done = rustic. :)
It was also pretty rough wood, so before going any further I sanded it down to prevent woe-inducing splinters later.
 |
| It fits! |
 |
| I eyeballed a decent looking length of rope... |
 |
| ...knotted it inside some holes we drilled into the end pieces... |
 |
| ...and voila! Beautiful rope handles. Magnificent. |
Then came dirt and herbs! I lined the bottom with a cut up, large plastic garbage bag to help with potential leaking, and the dirt pretty much keeps the water in everywhere else so far. Basil, chives, rosemary, cilantro, oregano...and a jalapeno, though success there might just be wishful thinking.
 |
| They're alive! (...for now) |
I wanted to paint some nice phrase on the side like "herb garden" or "kitchen herbs", and set about doing it the hardest way possible, which was by printing out letters and cutting them out of the paper to make a stencil, if that makes sense. I could have just cut them out the normal way, traced around the letters on the box, and painted that. But, nah. Never occurred to me. After getting halfway through cutting the "H" (from "Herb"...as in "Herb Garden"...yeah I didn't get far) out of the paper around it, I decided to throw that idea out and buy some stickers.
Sadly, a trip to Hobby Lobby proved that letter stickers are usually pretty small. So instead, at the suggestion of my brilliantly crafty cousin Kelsey, I got some cheap cork coasters and traced/cut some letters out of those. I should have taken pictures of that, because it was a bit ridiculous and tedious. Luckily, Kelsey came over to watch the Hobbit with me as I crafted the letters one by one. I love the result! :
Detail pics!
 |
| Am I a fan of how the letters and handles ended up matching? Yes, yes I am. |
I'm eventually going to get some nice, nutritious dirt for the herbs so I can raise them up out of the box a bit more, but overall I'm pretty pleased with the result. I don't know how long it will last, but I do love having a box o' greens in my sunny window.


I love it!!
ReplyDeleteThanks Caitlyn! It ended up being so easy and I'm glad I just went ahead and got it done :)
ReplyDeleteSo cute. I love it. You are truly unique.
ReplyDelete